 Get started
 help center
A/B Basics
Test parameters
Test results
Dashboard
A/B Basics
Creating an A/B test is as simple as plugging in different variations for Prices, Images, Titles, and Descriptions to see how they perform against each other. The more tests you perform, the more key data insights you will obtain to become more profitable. Here is a step-by-step guide to using Optimal A/B:
A/B testing is the practice of presenting your visitors with different variations of the same page or product listing with the intention of optimizing its performance. In order to ensure tests are ran properly, only one variable can be tested at a time for your product listings, such as Price, Images, Title, or Description. You can learn more about the practice of A/B testing here:
Optimal A/B is compatible with all Shopify stores (including Shopify Plus stores).
Since Optimal A/B only makes changes to products through Shopify directly, our app has no impact on your store’s performance.
Depending on what kind of test you run, Optimal A/B will make changes to a single aspect of your product listing on a set interval. These changes are based on different variables you want to test, such as different variations of: Prices, Images, Titles or Descriptions. As each variant is tested, we will capture data insights that will allow you to see which variant has the highest impact to your store’s profitability, see data analytics for more on this.
As part of creating an A/B test, you will need to decide on a frequency for how often the app will change and update the product listing to each test variant.
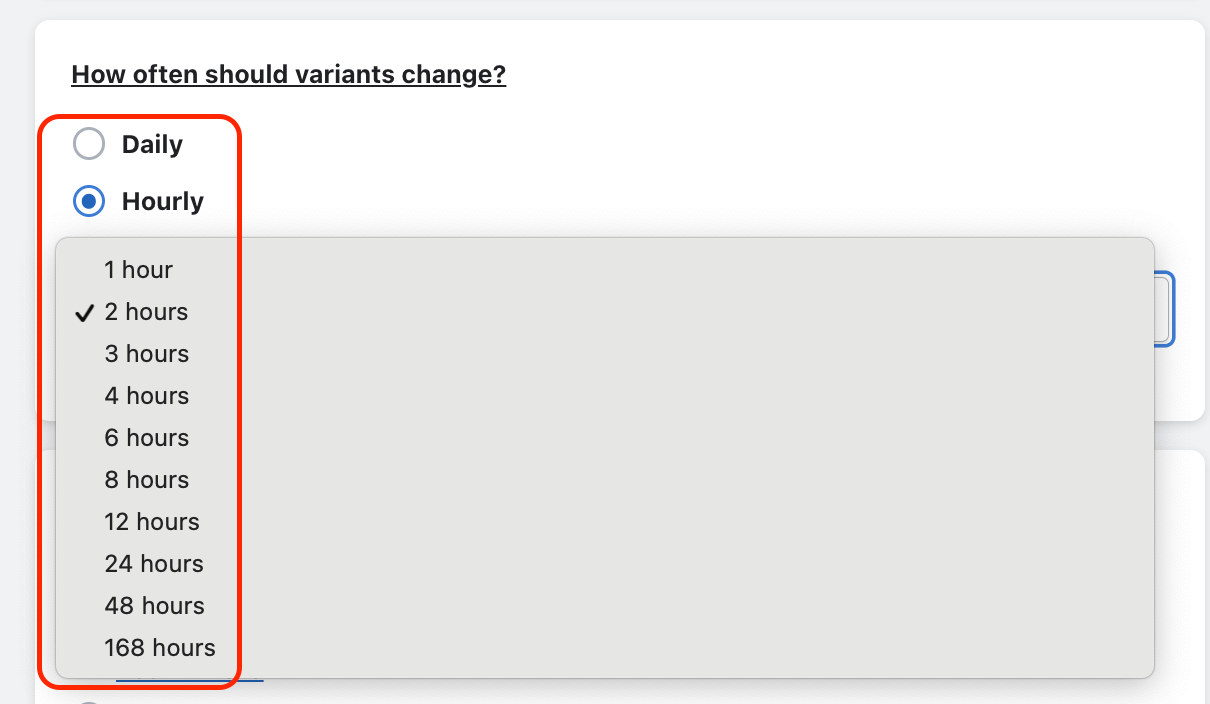
Then you will need to select an end goal for the test:
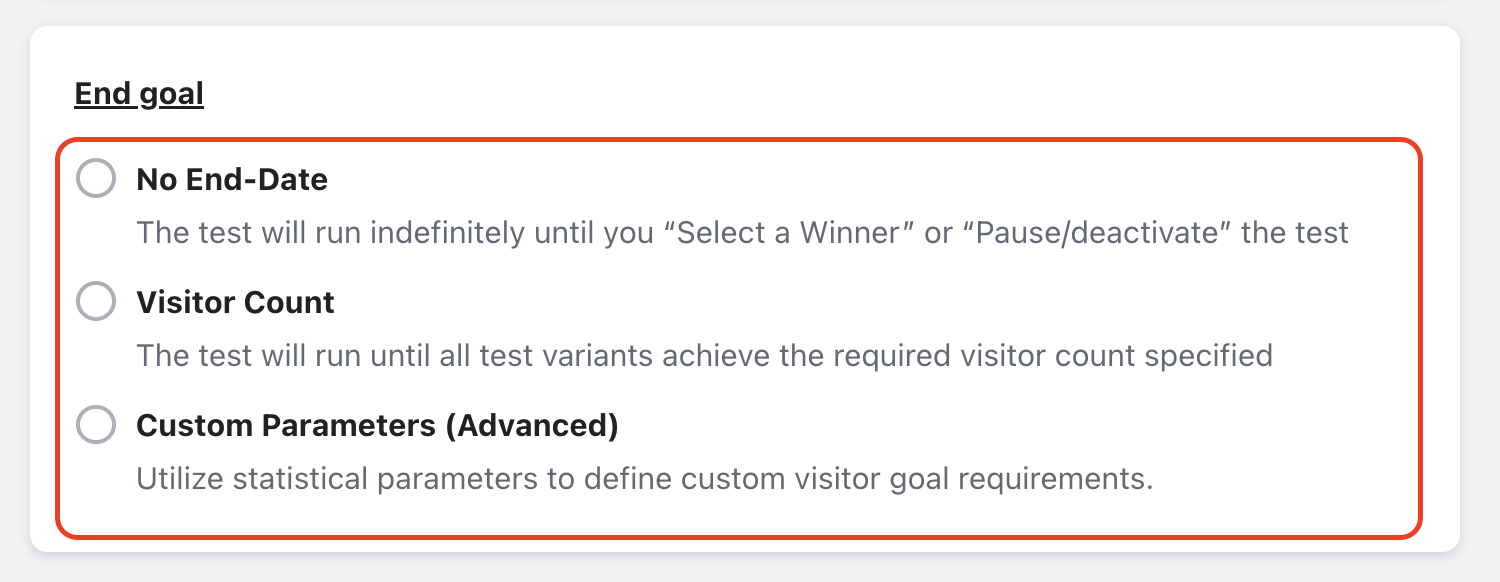
No End Date = Tests will run indefinitely until you select a winner or de-activate them.
Visitor Count= You specify the amount of visitors each variant will need to achieve (at a minimum) to end the test.
Custom Parameters = A premium feature that allows you to use statistical inputs to pinpoint your visitor goal.
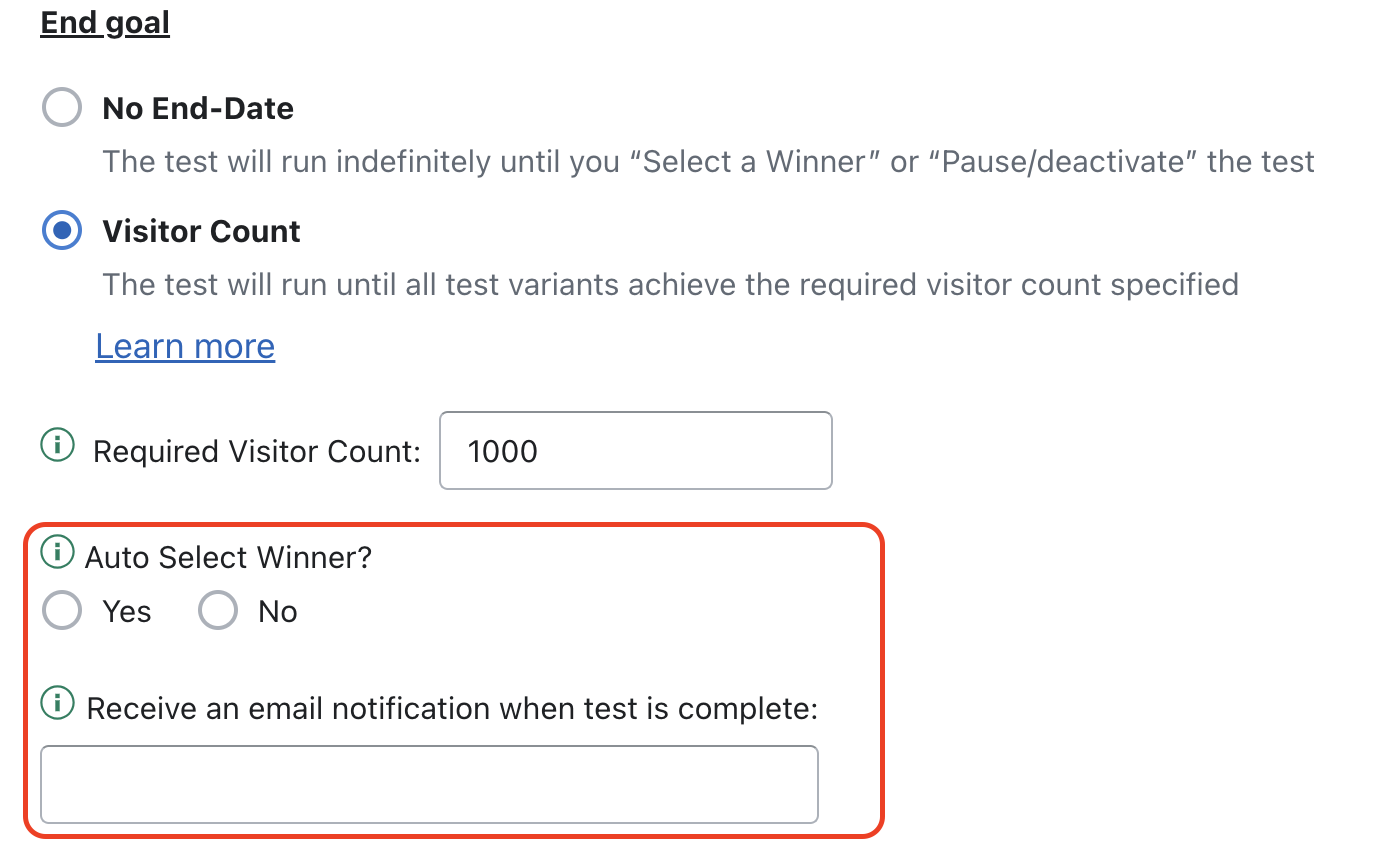
“Visitor Count” & “Custom Parameter” tests offer the option for us to select a winner for you at the end of the test (based on the best performing variant). Enter your email address if you wish to receive an email notification alerting you once the test is complete:
Here is a step-by-step guide for using Optimal A/B:
When running a price test, the product “Cost” (your cost for the product) and “Price” (what your customer will pay for the product) are both required fields. The “Compare at price” field is optional. Optimal A/B will calculate: (profit)/(views) for each price point you want to test against. This will help you determine which price point generates the highest “Average Profit Per View” for the product listing (which is the default metric we use to determine the best performing variant).

Identify the “Image(s)” for your product listing that captures your visitor’s interest the best. Optimal A/B will calculate: (revenue)/(views) for each image configuration you want to test against. This will help you determine which Image(s) generate the highest “Average Revenue Per View” (which is the default metric we use to determine the best performing variant).
Identify the product “Title” for your product listing that captures your visitor’s interest the best. Optimal A/B will calculate: (revenue)/(views) for each title you want to test against. This will help you determine which Title generates the highest “Average Revenue Per View” (which is the default metric we use to determine the best performing variant).
Identify the product “Description” for your product listing that captures your visitor’s interest the best. Optimal A/B will calculate: (revenue)/(views) for each description you want to test against. This will help you determine which Description generates the highest “Average Revenue Per View” (which is the default metric we use to determine the best performing variant).
If you want to ensure you are running tests that are “statistically significant”, refer to this blog article:
https://www.invespcro.com/blog/how-to-analyze-a-b-test-results/
Only “Draft” and “Scheduled” status tests can be edited by clicking on the gear icon from the Dashboard page:

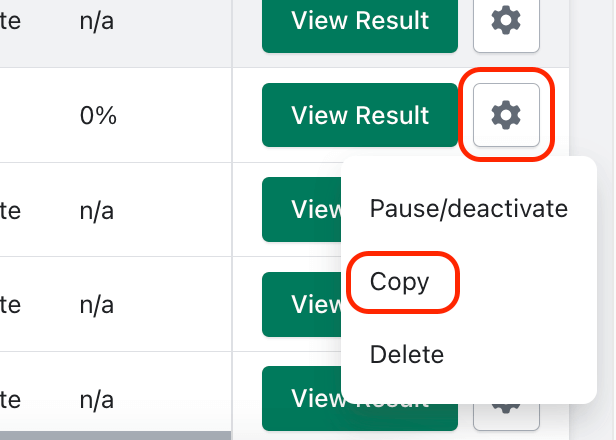
If a test has already started running, you can press the “Copy” button instead:
Running multiple tests for the same product skews test data for both tests making it impossible to know which test variable helped or hurt the overall test performance. Instead, Optimal A/B requires that you only test one variable at a time for each product, leaving all other variables the same.
“In an experiment, scientists only test one variable at a time to ensure the results can be attributed to that variable. If more than one variable is changed, scientists cannot attribute the changes to one cause.”
-Google AI
“Free” plan subscribers can test up to 2 variants per test.
“Basic” plan subscribers can test up to 3 variants per test.
“Premium” & “Enterprise” plan subscribers can test up to 6 variants per test.
See additional plan details here.
Testing multiple variables for the same product skews test data which makes it impossible to know which test variable helped or hurt the overall test performance. Instead, Optimal A/B requires that you only test one variable at a time for each product, leaving all other variables the same.
“In an experiment, scientists only test one variable at a time to ensure the results can be attributed to that variable. If more than one variable is changed, scientists cannot attribute the changes to one cause.”
-Google AI
Free Plan Benefits:
- 1 A/B test at a time
- 2 variants per test
- Detailed Analytics
- Customer support
Basic Plan Benefits:
- Run up to 5 A/B tests at once
- Test up to 3 variants per test
- Automation settings
- Detailed analytics
- Customer Support
Premium Plan Benefits:
- Run unlimited A/B tests at once
- Test up to 6 variants per test
- Custom parameter tests
- Automation settings
- Detailed analytics
- Customer Support
Enterprise Plan Benefits:
- All Premium features
- Advanced Analytics (by traffic source)
- Advanced customer support
Plan Downgrades:
If you received an error message when trying to downgrade your subscription, you must ensure that you are not using any of the following three “Premium” / “Enterprise” plan benefits before you are eligible to downgrade:
- On the Dashboard, you need to have a total of 5 or less “Running” or “Scheduled” tests (or 1 or less for Free plan)
- None of your “Running” or “Scheduled” tests can have more than 3 test variants (or 2 variants for a Free plan)
- None of your “Running” or “Scheduled” tests can have custom parameters in use (a “Custom” end goal)
To quickly check how many running/scheduled tests you have, you can use the “Filter” feature and select “Running” & “Scheduled” tests only:

To check the number of test variants for running/scheduled tests, click “View Results” and count the number of variants:

To check if a running/scheduled test is using custom parameters, locate the “End Goal” column on the Dashboard. Tests using custom parameters will say “Custom”:

How to make “Scheduled” tests eligible for plan downgrade (click gear icon):
- Edit test (and modify it accordingly)
- Delete test
How to make “Running” tests eligible for plan downgrade:
- Delete test
- Wait until test is finished
- Pause/Deactivate test
- Select a Winner
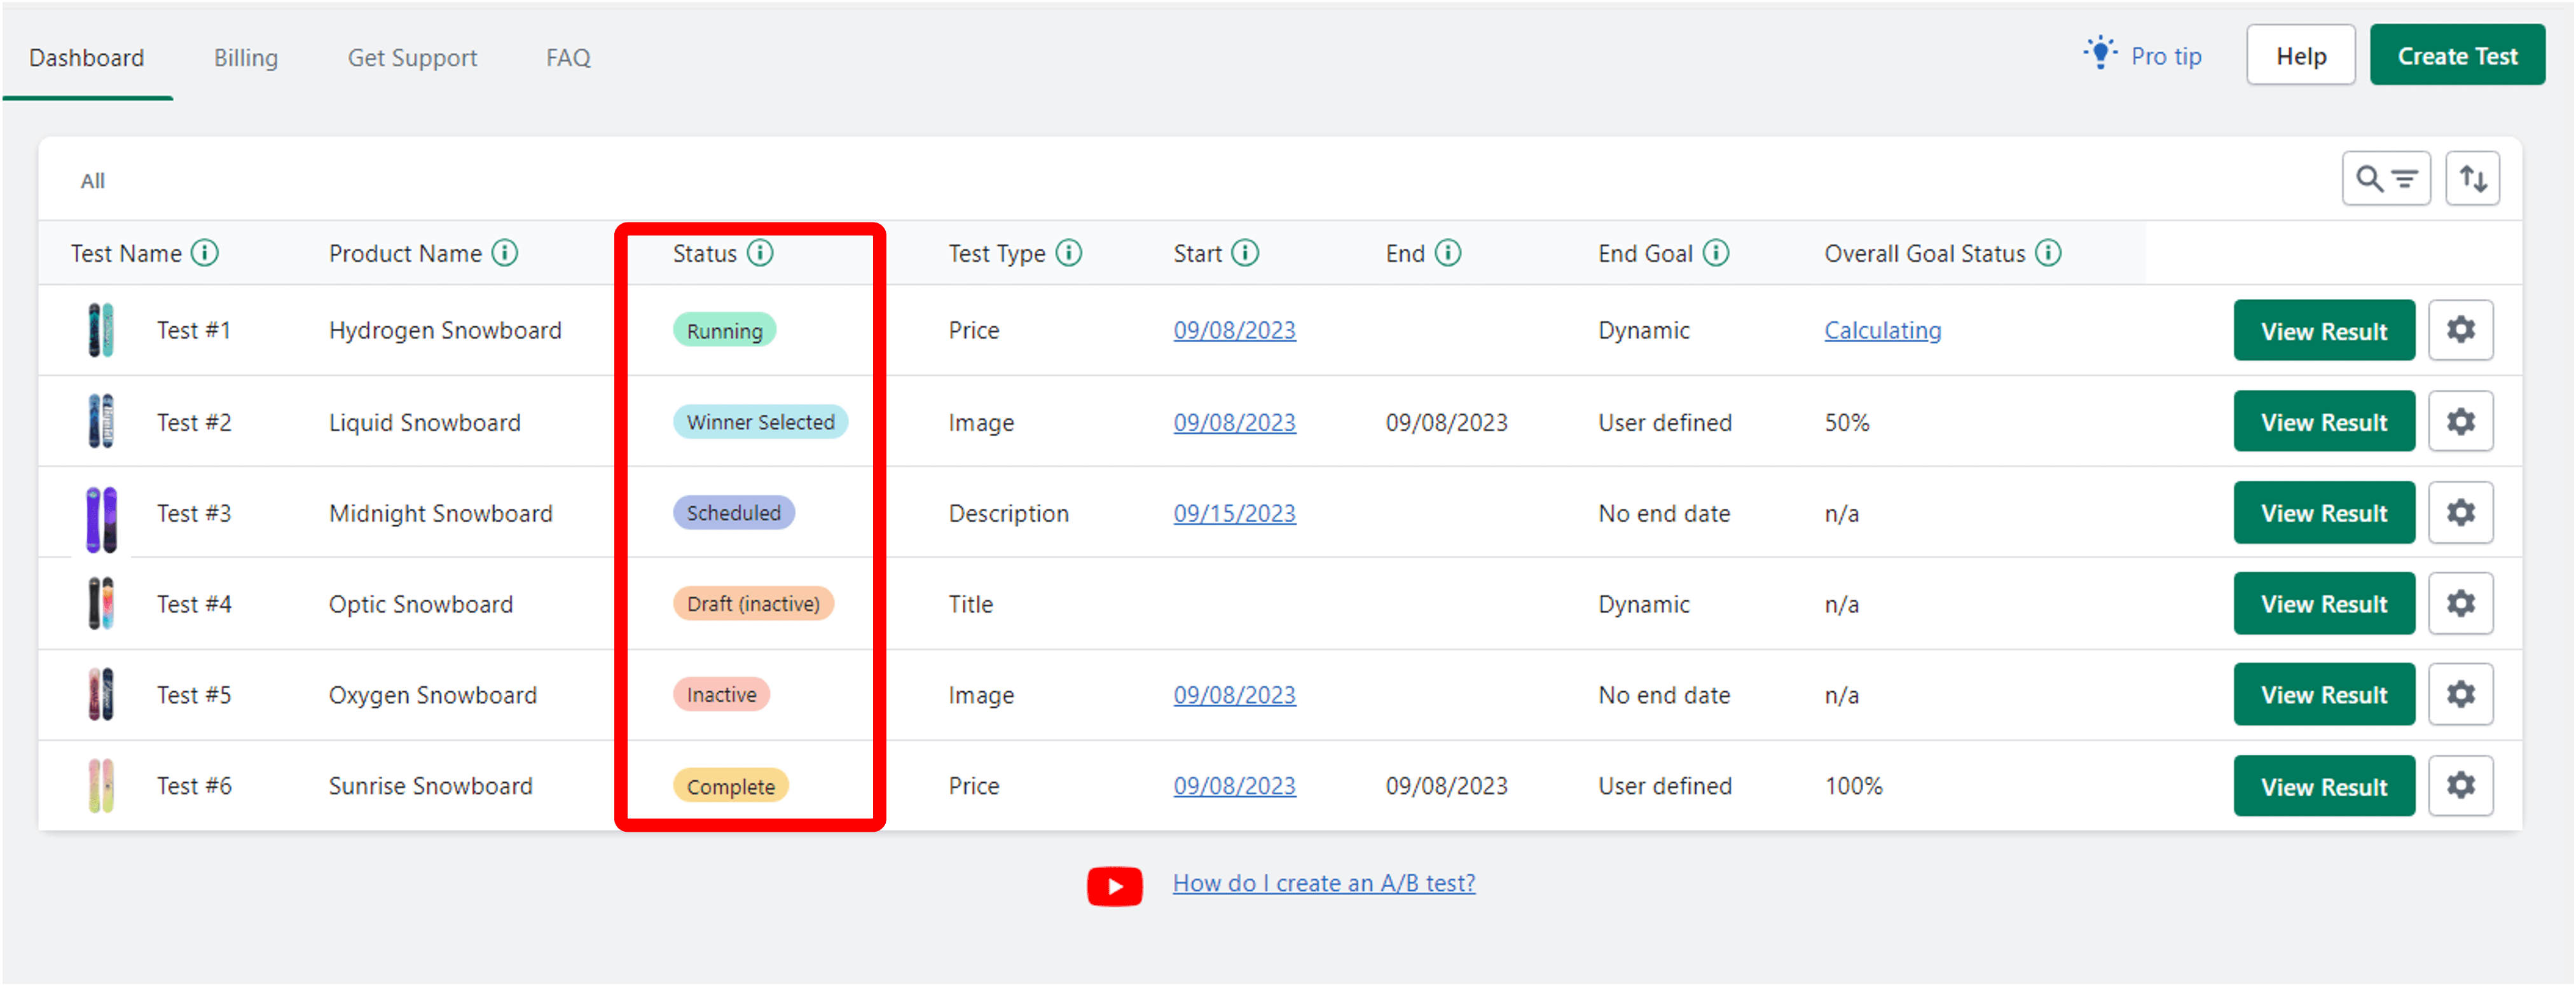
Running: If a test is Running, that means Optimal A/B is actively changing your product listing on a scheduled basis using each test variant you created. This also means we are actively collecting data for each variant to ultimately find the variation that is the best performing “Winner”.
Winner selected: This status means that you have selected a winner yourself (on the test results page) or you enabled “Auto Select Winner” and the test reached its required visitor goal. This status also indicates that the test is no longer actively cycling through test variants, nor are we collecting data any longer for this test.
Scheduled: This means that once a certain point in time is reached, the test will automatically start running for the first time.
Draft: This is a test that has never actually started running yet. This means you can also “Edit” the test. There is no limit to how many Draft tests you can create.
Inactive: An inactive test is a test that was running at one point but was manually paused/deactivated. While you cannot “Edit” Inactive tests, you can copy or delete them still.
Complete: Occurs if each variant (within the test) reaches the test’s required visitor goal. It also means you did NOT enable “Auto Select Winner” when setting up the test. If a test has a status of “Complete”, this means we changed the test variable back to how it was before you started the test. Lastly, this status indicates that the test is no longer actively cycling through test variants, nor are we collecting data any longer for this test.
Product Deleted: This status indicates that you deleted a product listing outside of the app while running an A/B test for that same product. It is never recommended to edit, modify, or delete a product listing outside of the app while there is a test running for that same product. Deleting a product will also prevent the test from being activated again in the future.
Test parameters
Naming Tests: Creating a descriptive name for your A/B test will help ensure you will be able to quickly identify key elements of the test at a quick glance. Customers will not see the test name; its only purpose is to assist you in keeping track of your A/B Tests:

(Note: you can edit the test name after the test has started by clicking the “Pencil” button next to the test name, in the View Results page of a test):

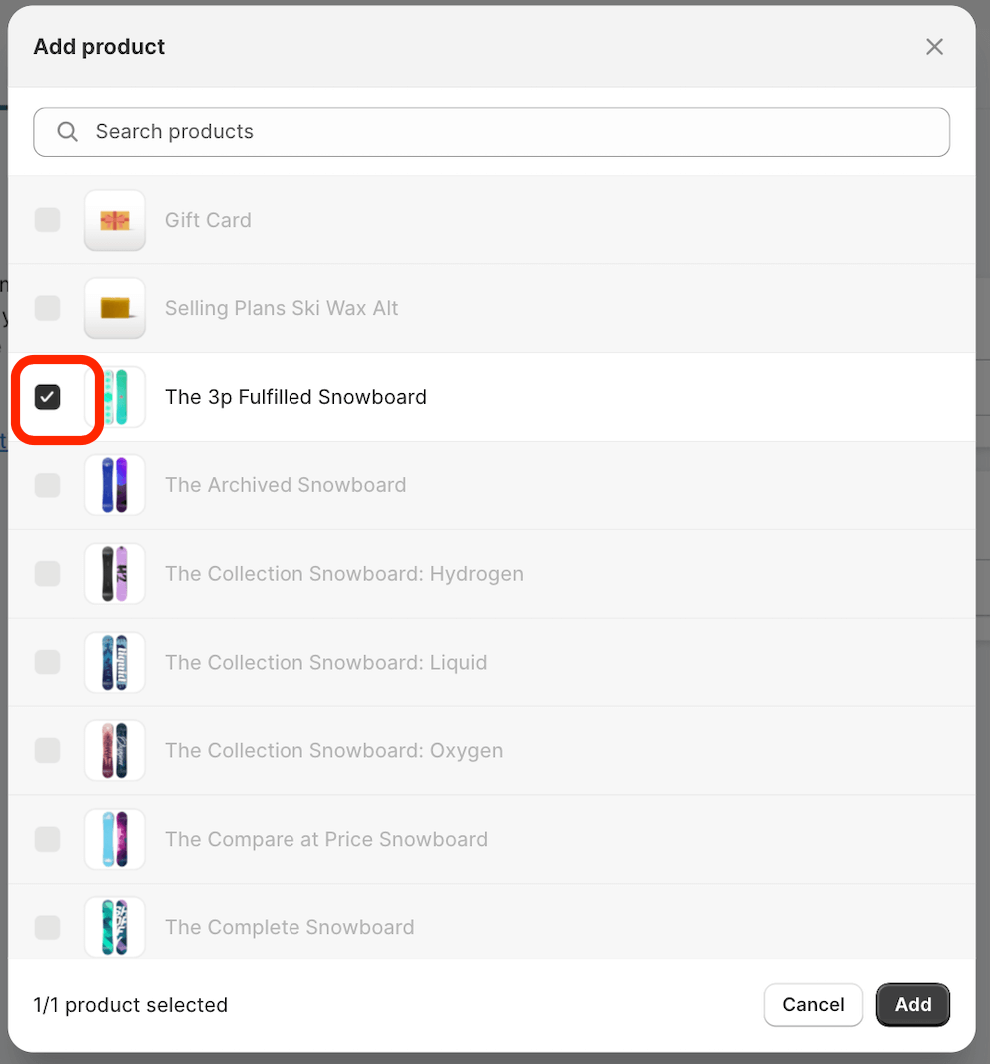
Selecting Products: Click “Select Product” on the “Test Details” screen. Keep in mind that if you wish to change the product selection, you will first need to click the checkmark next to the selected product to de-select it:
On the right portion of the “Variants” page is where you configure different variations of: Prices, Images, Titles, or Descriptions, depending on what type of test you are running:
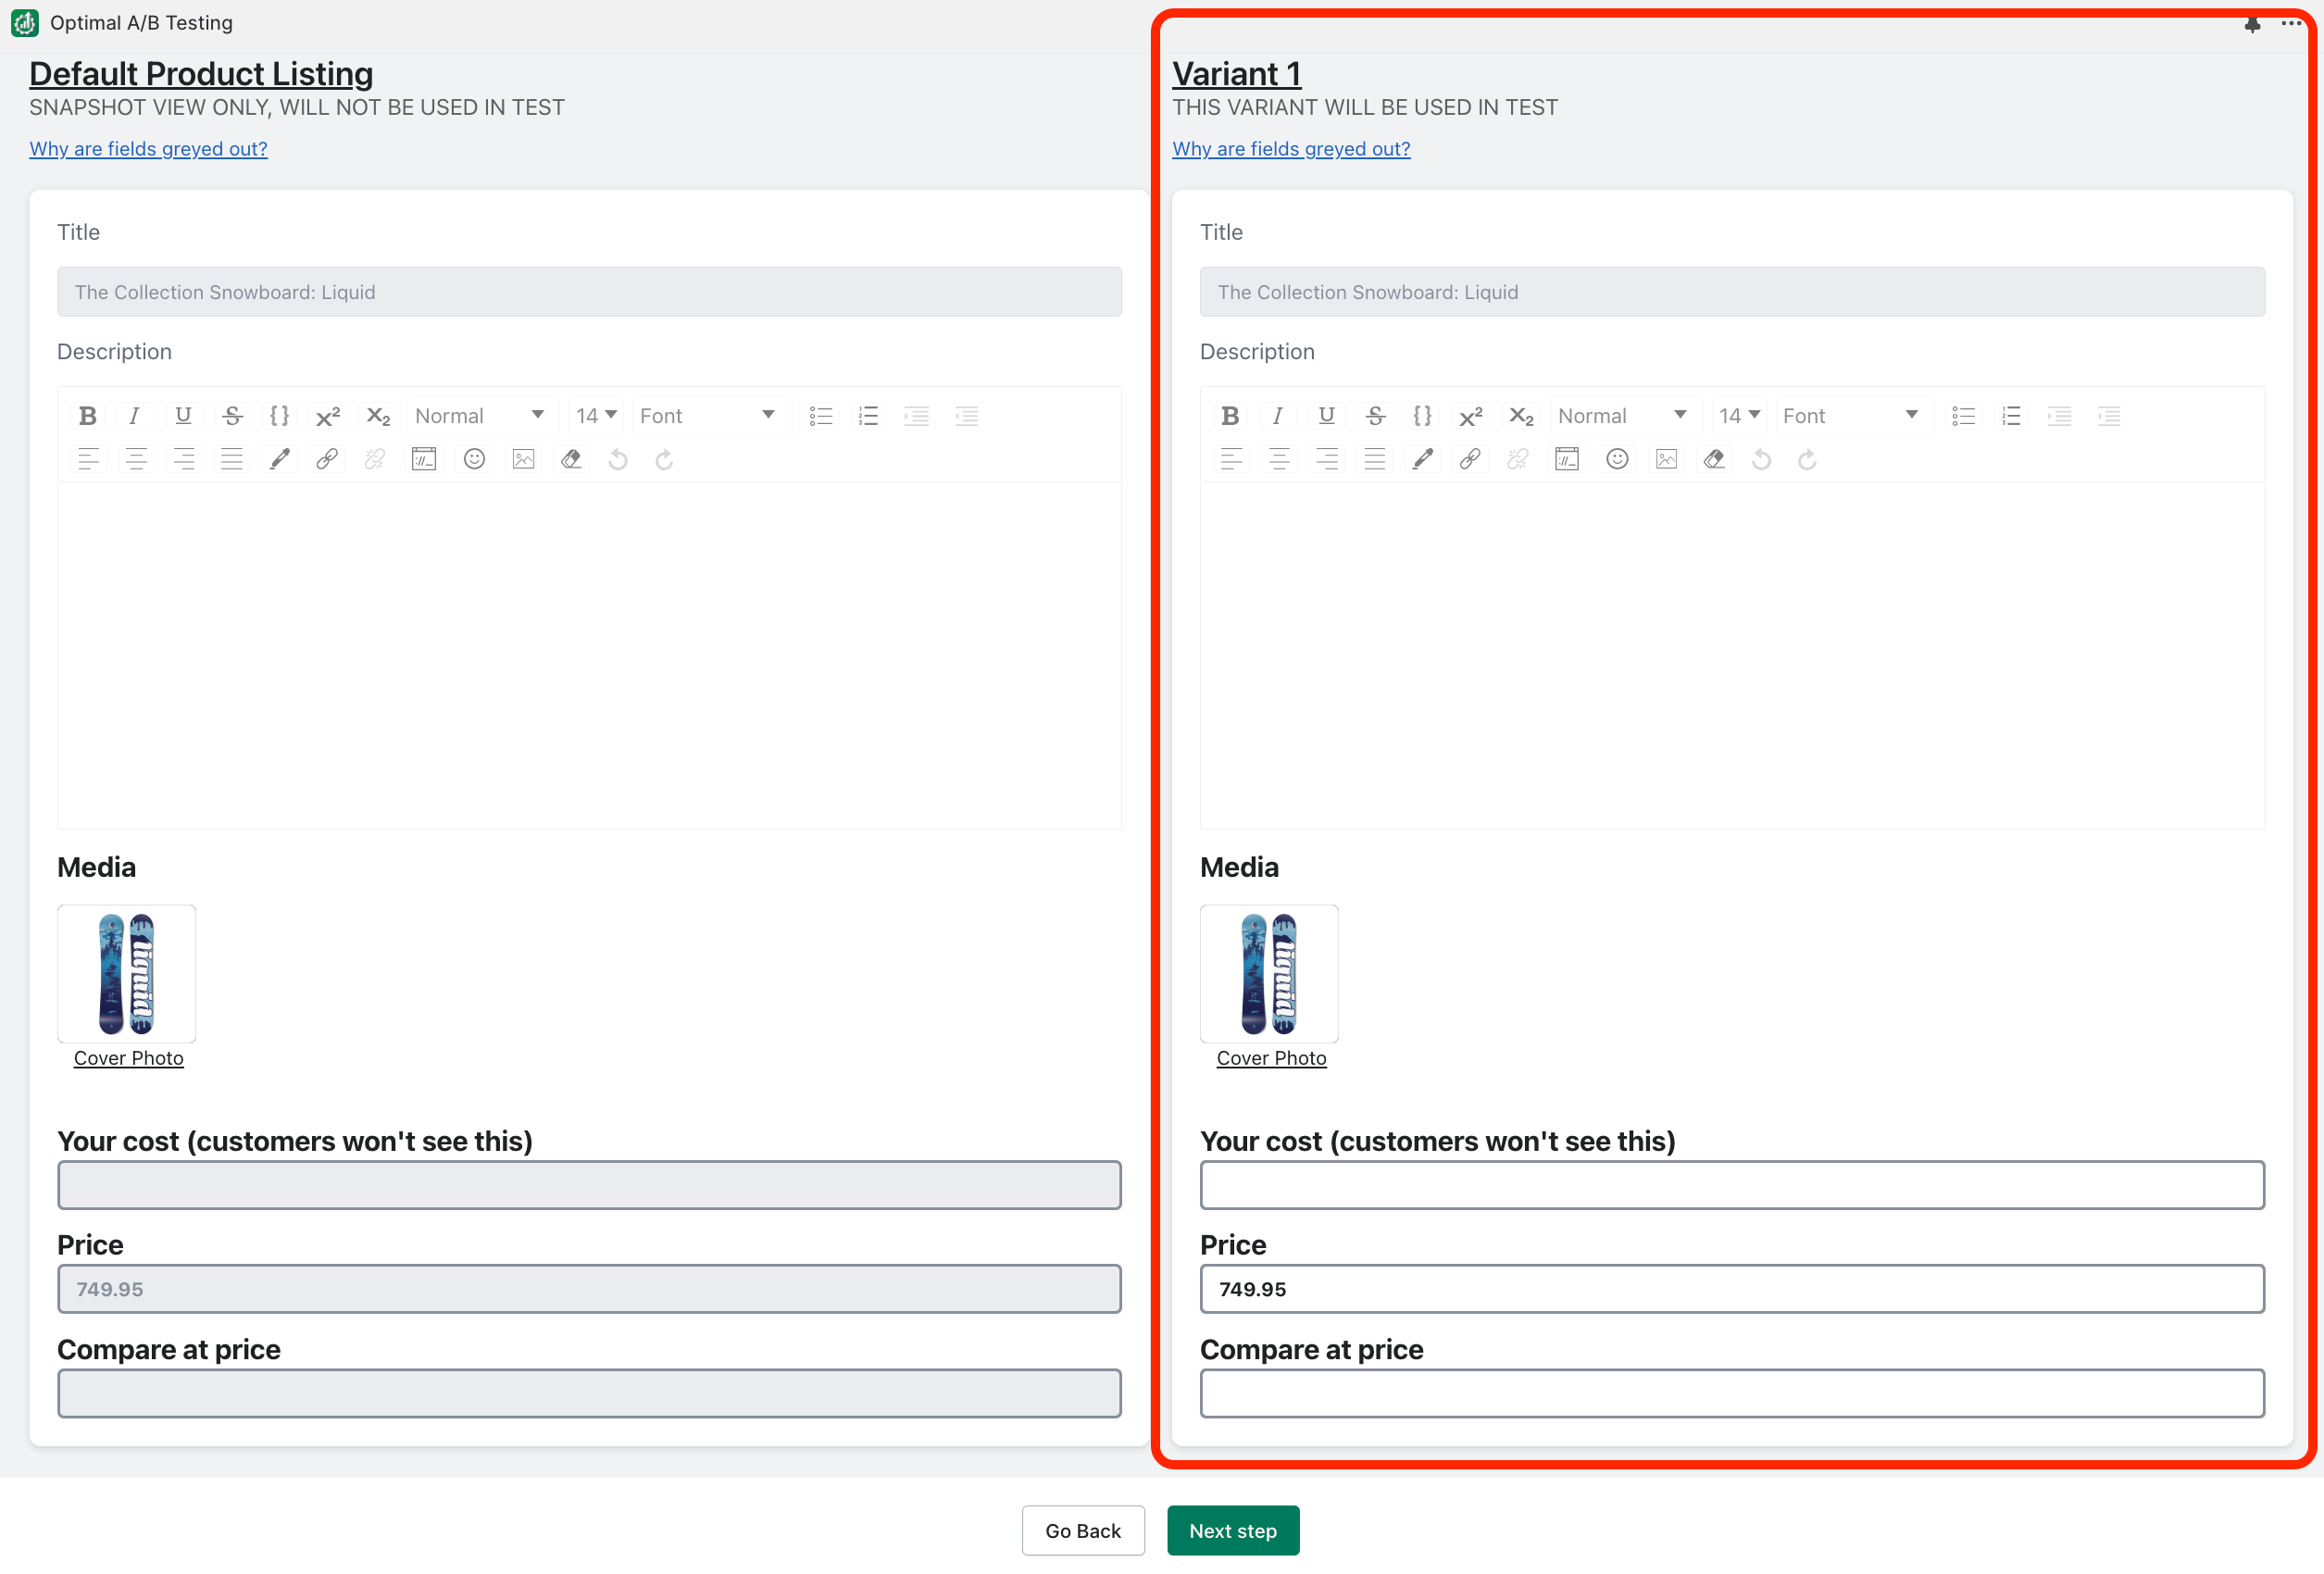
Optimal A/B will automatically cycle through all the different variants you setup here and we will record data for each variant to identify a clear best performing “Winner”.
Optimal A/B changes your product listings on a scheduled interval. If your test starts or is scheduled to start at 8:30 PM for example, and you select a change frequency of 12 hours, the app will alternate between changing your product listing at 8:30 AM and 8:30 PM every day for each variant until the test is no longer running.
If you are running a paid promotion campaign to drive traffic to certain product pages on your website, it is important to select a change frequency that will allow adequate visitor exposure to each test variant. For example, choosing a “Daily” change frequency would be a bad idea if you are only running the paid promotion for one day, but a “Daily” change frequency might be fine if you were going to run the paid promotion for 30 days (depending on how much traffic your store is getting).
Price Testing: Any time you change the price of your product (through Shopify directly or through our A/B testing app), there is a possibility of it occurring while a customer is in the middle of checking out. This will result in the mandatory recalculation of the cart, to reflect the price change. This is because Shopify will not honor the price that the customer saw when they added the product to their cart. Thus, it is best to select a change frequency for price testing such as 24 hours or greater, to lower the chance of this occurring. You can also schedule the test to start at a specific time of the day when you have the least amount of traffic, to further reduce this possibility.
End Goal
No End-Date: These tests will run indefinitely until you “Select a Winner” or “Pause/deactivate” the test.
Visitor Count: You specify the amount of visitors each variant will need to achieve (at a minimum) to end the test.
Custom Parameters: Define custom test parameters to create a custom sample size/visitor goal that each test variant must achieve before the test is considered complete (and variant changes no longer occur):
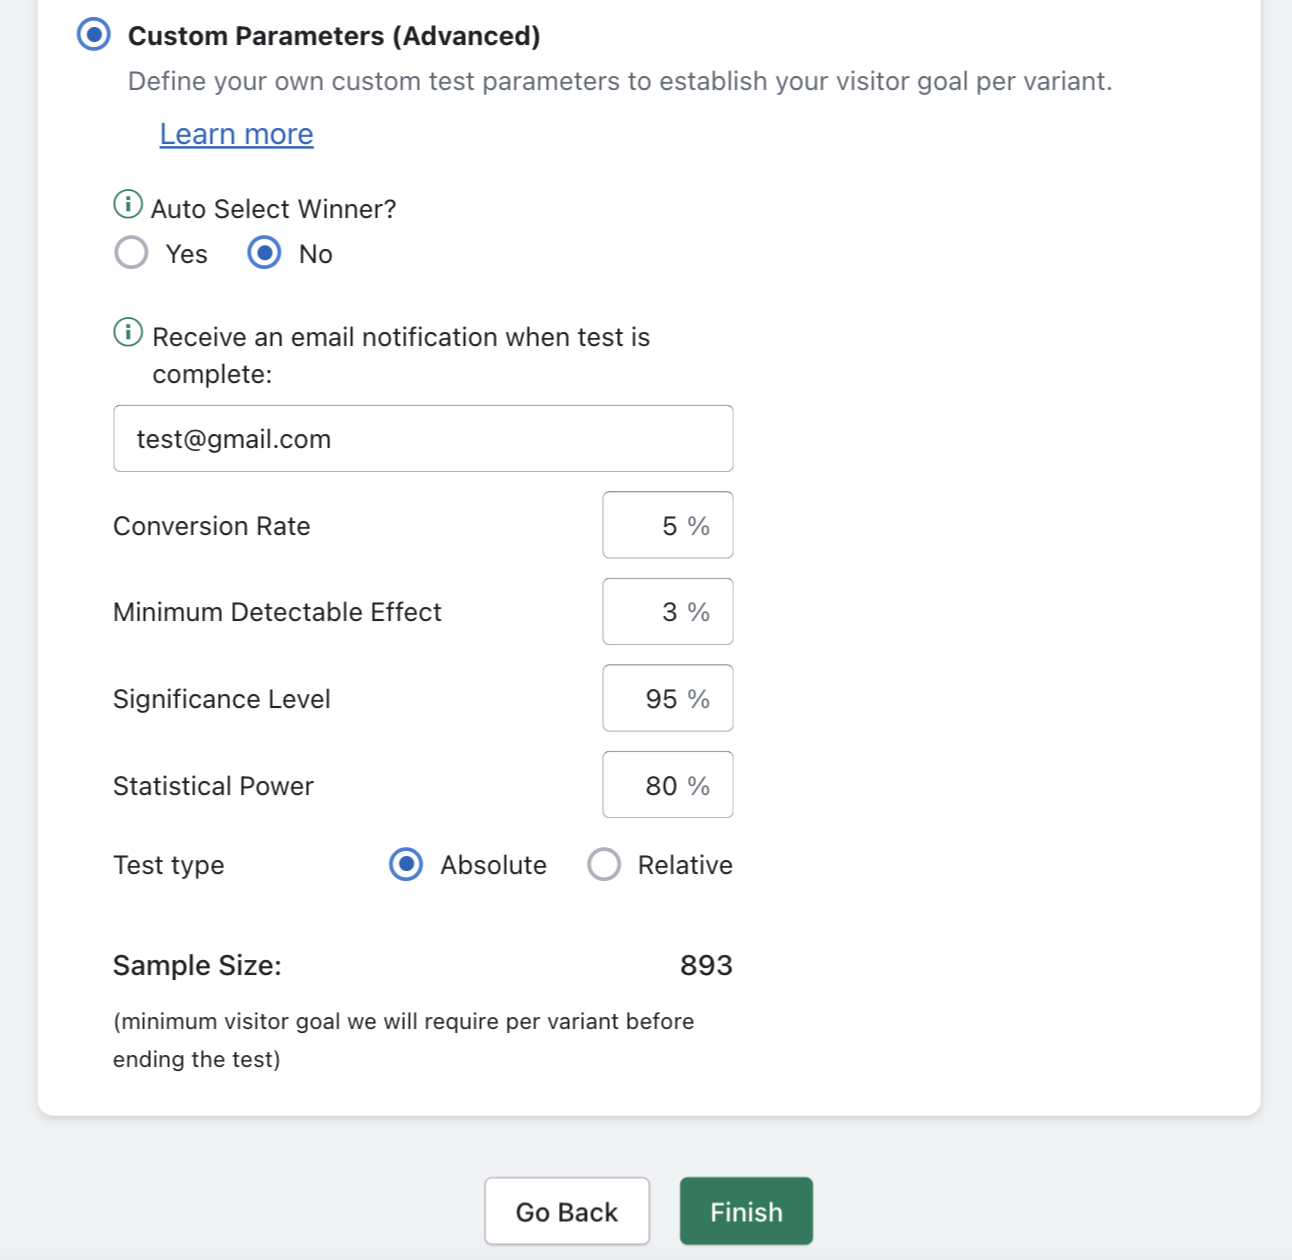
This feature is best suited for store owners who have very clear objectives with their A/B Testing needs and want to ensure their tests are ran in a statistically significant manner. See this article to learn more about statistically significant A/B Testing:
https://www.invespcro.com/blog/how-to-analyze-a-b-test-results/
Greyed Out Fields
Default Product Listing Snapshot: You will notice that all fields are greyed out on the Default Product listing/ Snapshot view. That is because the Snapshot view’s only purpose is to show you what the product listing looks like at the time the test is created:
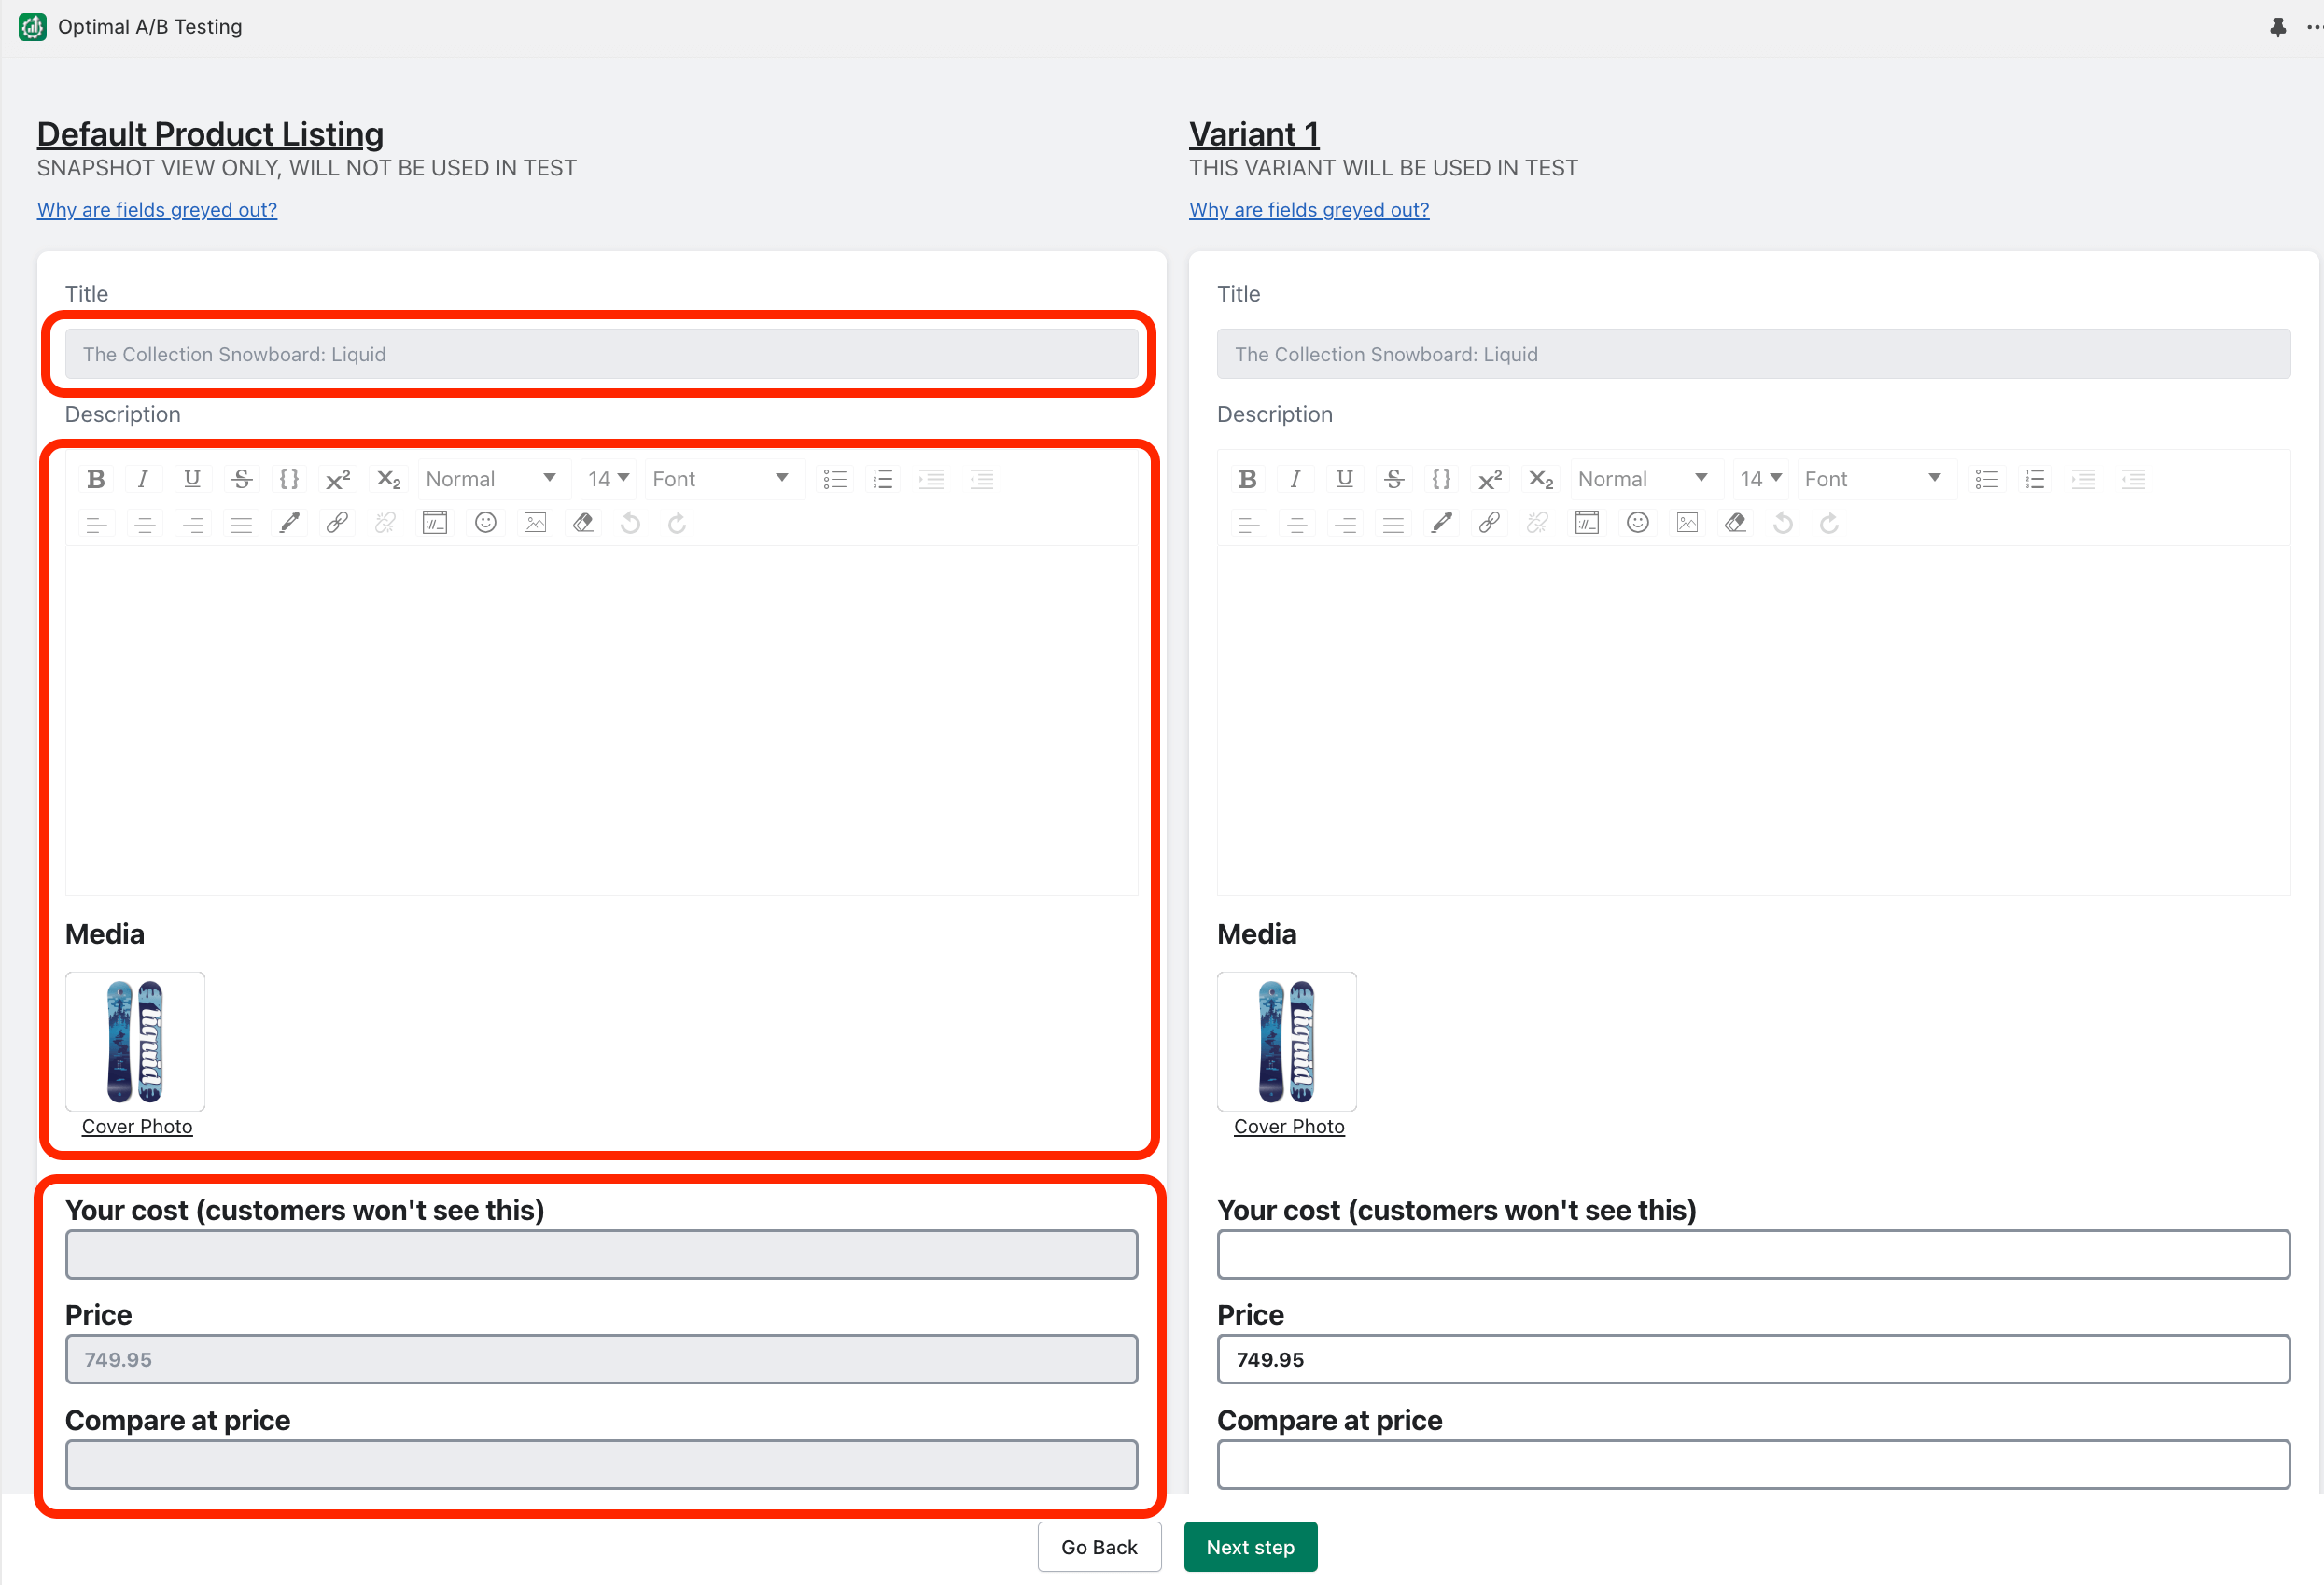
Test Variants: The reason fields are greyed out within a test variant window is because Optimal A/B will not be changing or testing these variables. For example, if you are running an “Image test”, the Title, Description and Price fields will all be disabled/greyed out, because the app will not be changing those variables once you begin running the image test:

Importance of “Cost” in Price tests
The default and most effective way we believe to determine the success of different price points is by identifying the price variant (price point) that yields the highest “Average Profit Per View”. To calculate this, we must know your product’s cost. Don’t worry, we won’t share your cost information with your customers, or anyone else.
Custom Parameter tests allow you to fine tune the following variables below so that you can pinpoint the exact sample size (visitor goal) which each variant must achieve for the test to become complete:

Test results
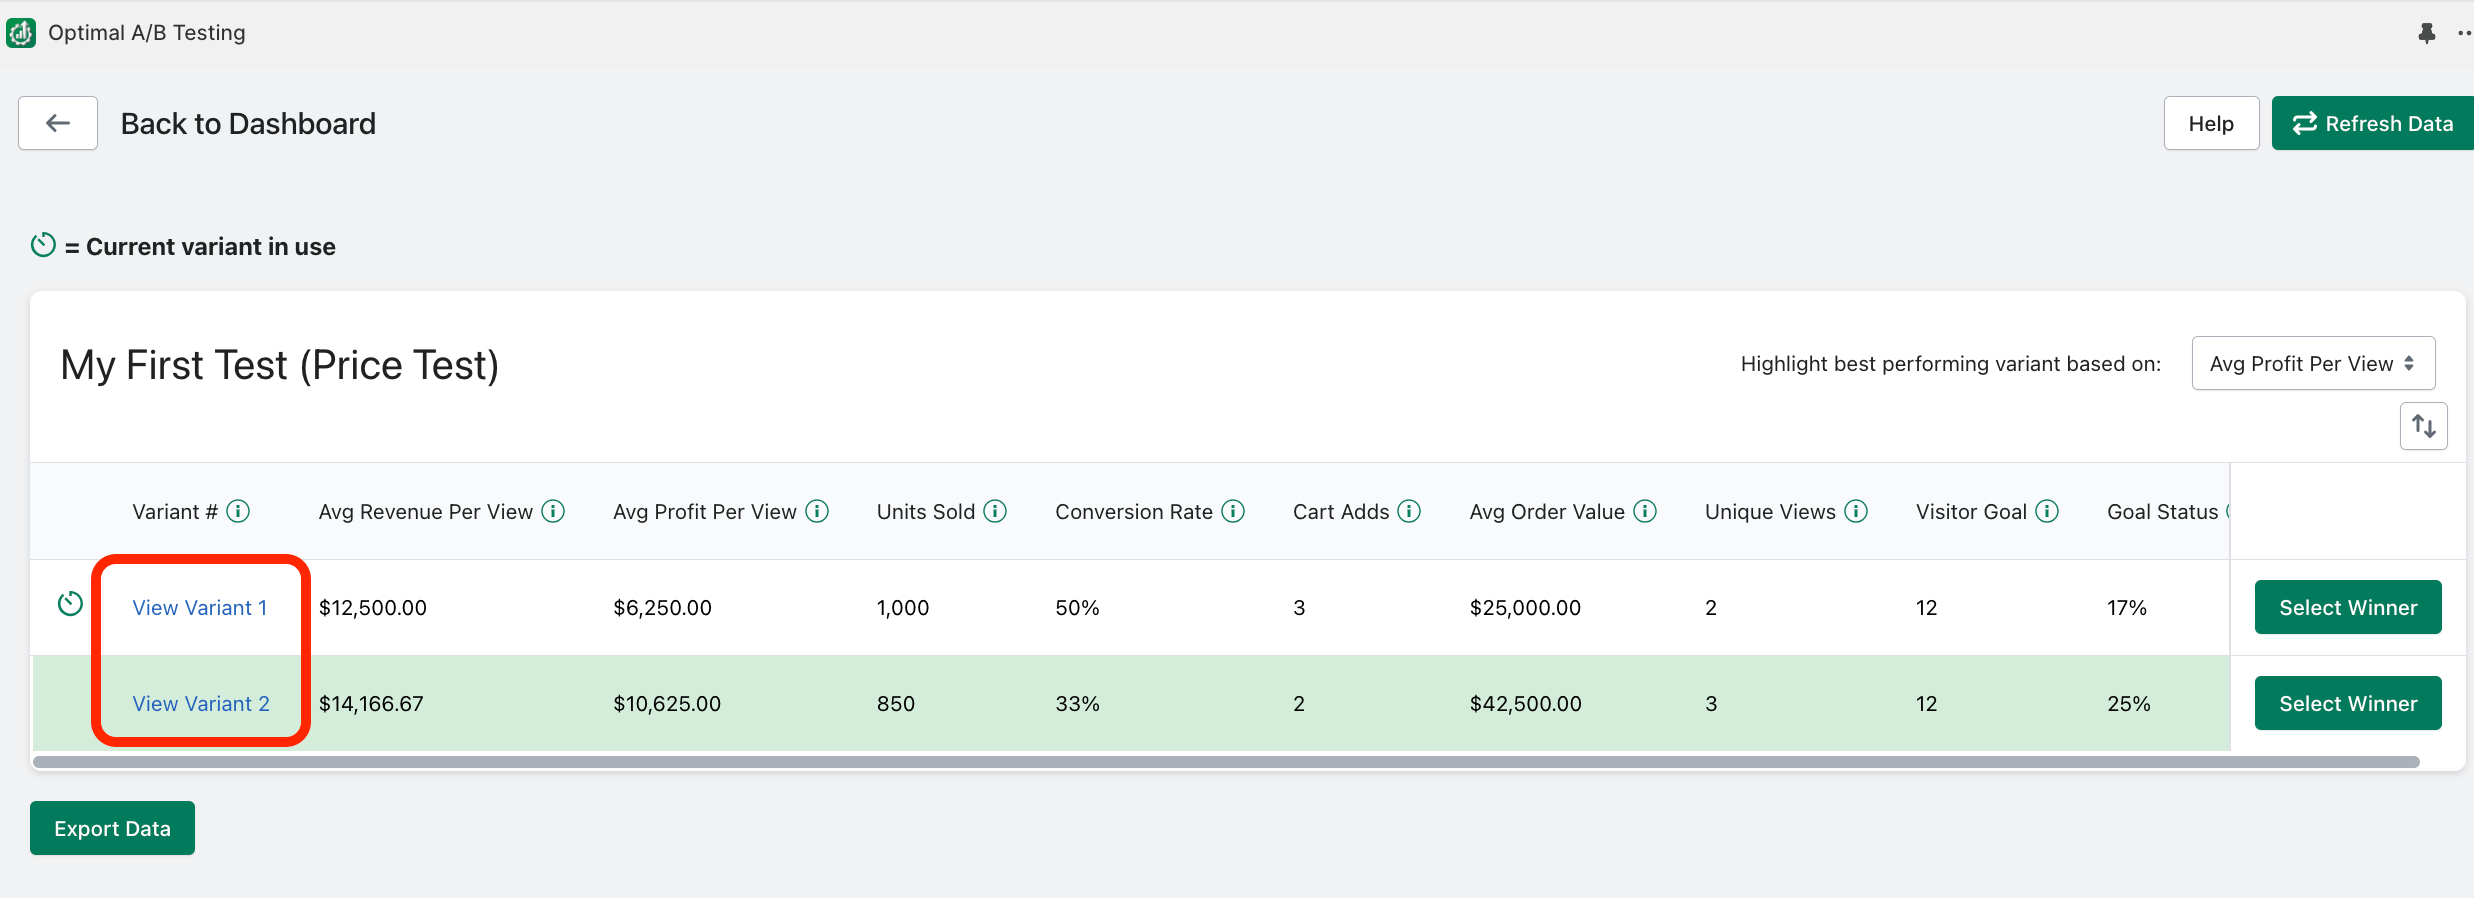
Avg Revenue Per View: The average revenue generated by a single view for a given test variant. This is the default metric used to determine the winning variation for Image, Title, and Description tests.
Avg Profit Per View (only available for Price tests): The average profit generated by a single view for a given variant. This is the default metric used to determine the winning variation for Price tests.
Units Sold: The total number of units sold of the product for each test variant
Conversion Rate: The calculated percentage for how often a page view for the product leads to a purchase for each test variant
Cart Adds: The total number of times the product has been added to the cart for each test variant
Avg Order Value: The average dollar value for each order which includes the test product within the order
Unique Views: The number of unique visitors that land on the product page for a given test variant
If a test has already started running (currently or at some point), you can “Select a Winner”. Selecting a winner will end running tests and immediately change the product listing to the selected variant. This variant will remain indefinitely unless you re-activate the test later or change the product listing outside of the app. To select a winner, click “View Results” and then “Select Winner”:
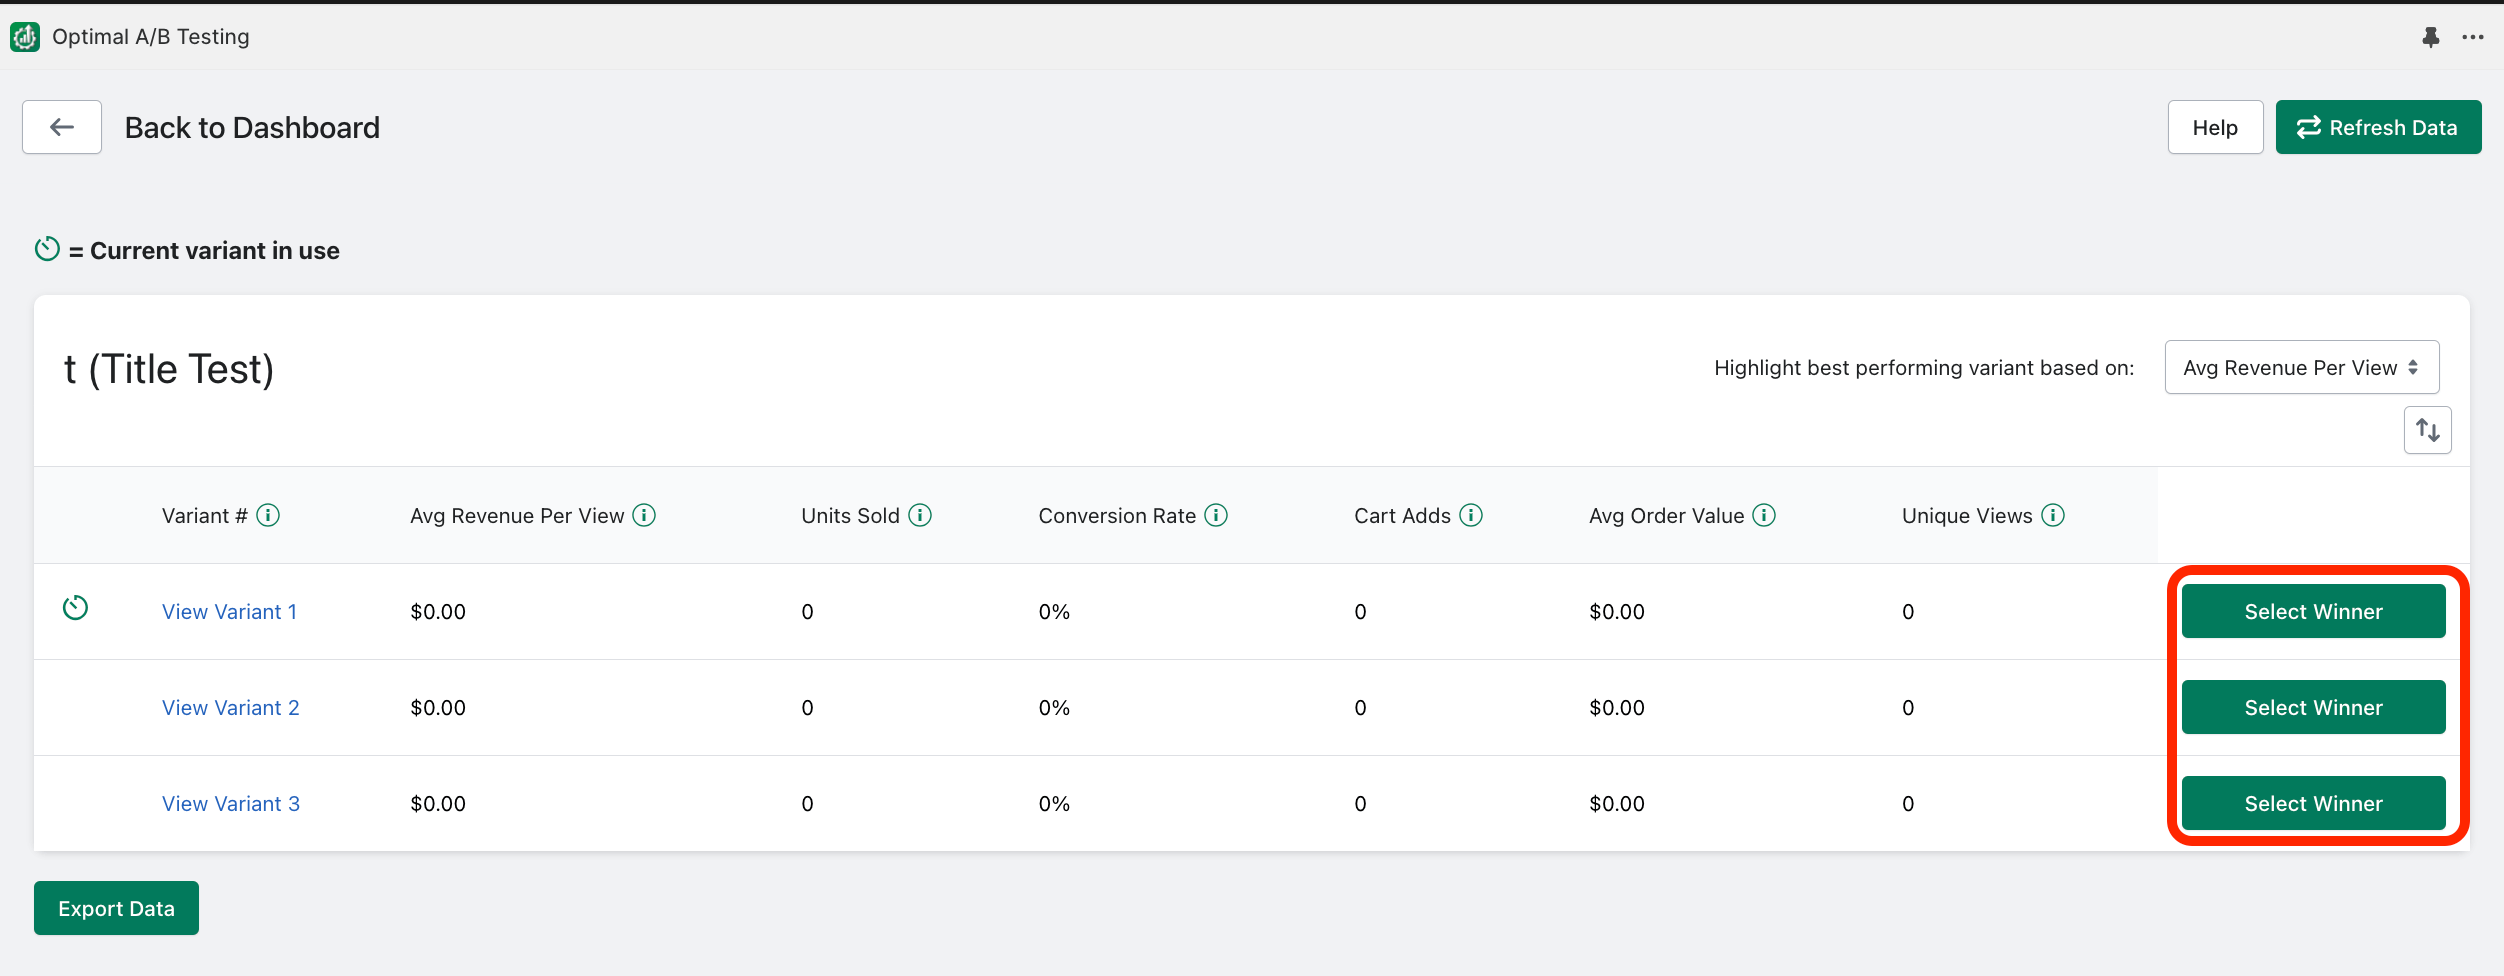
Once a test starts receiving activity, Optimal A/B will automatically highlight the best performing variant in green:

Price tests will default to highlighting the test variant with the highest “Average Profit Per View”.
All other tests will default to highlighting the test variant with the highest “Average Revenue Per View”.
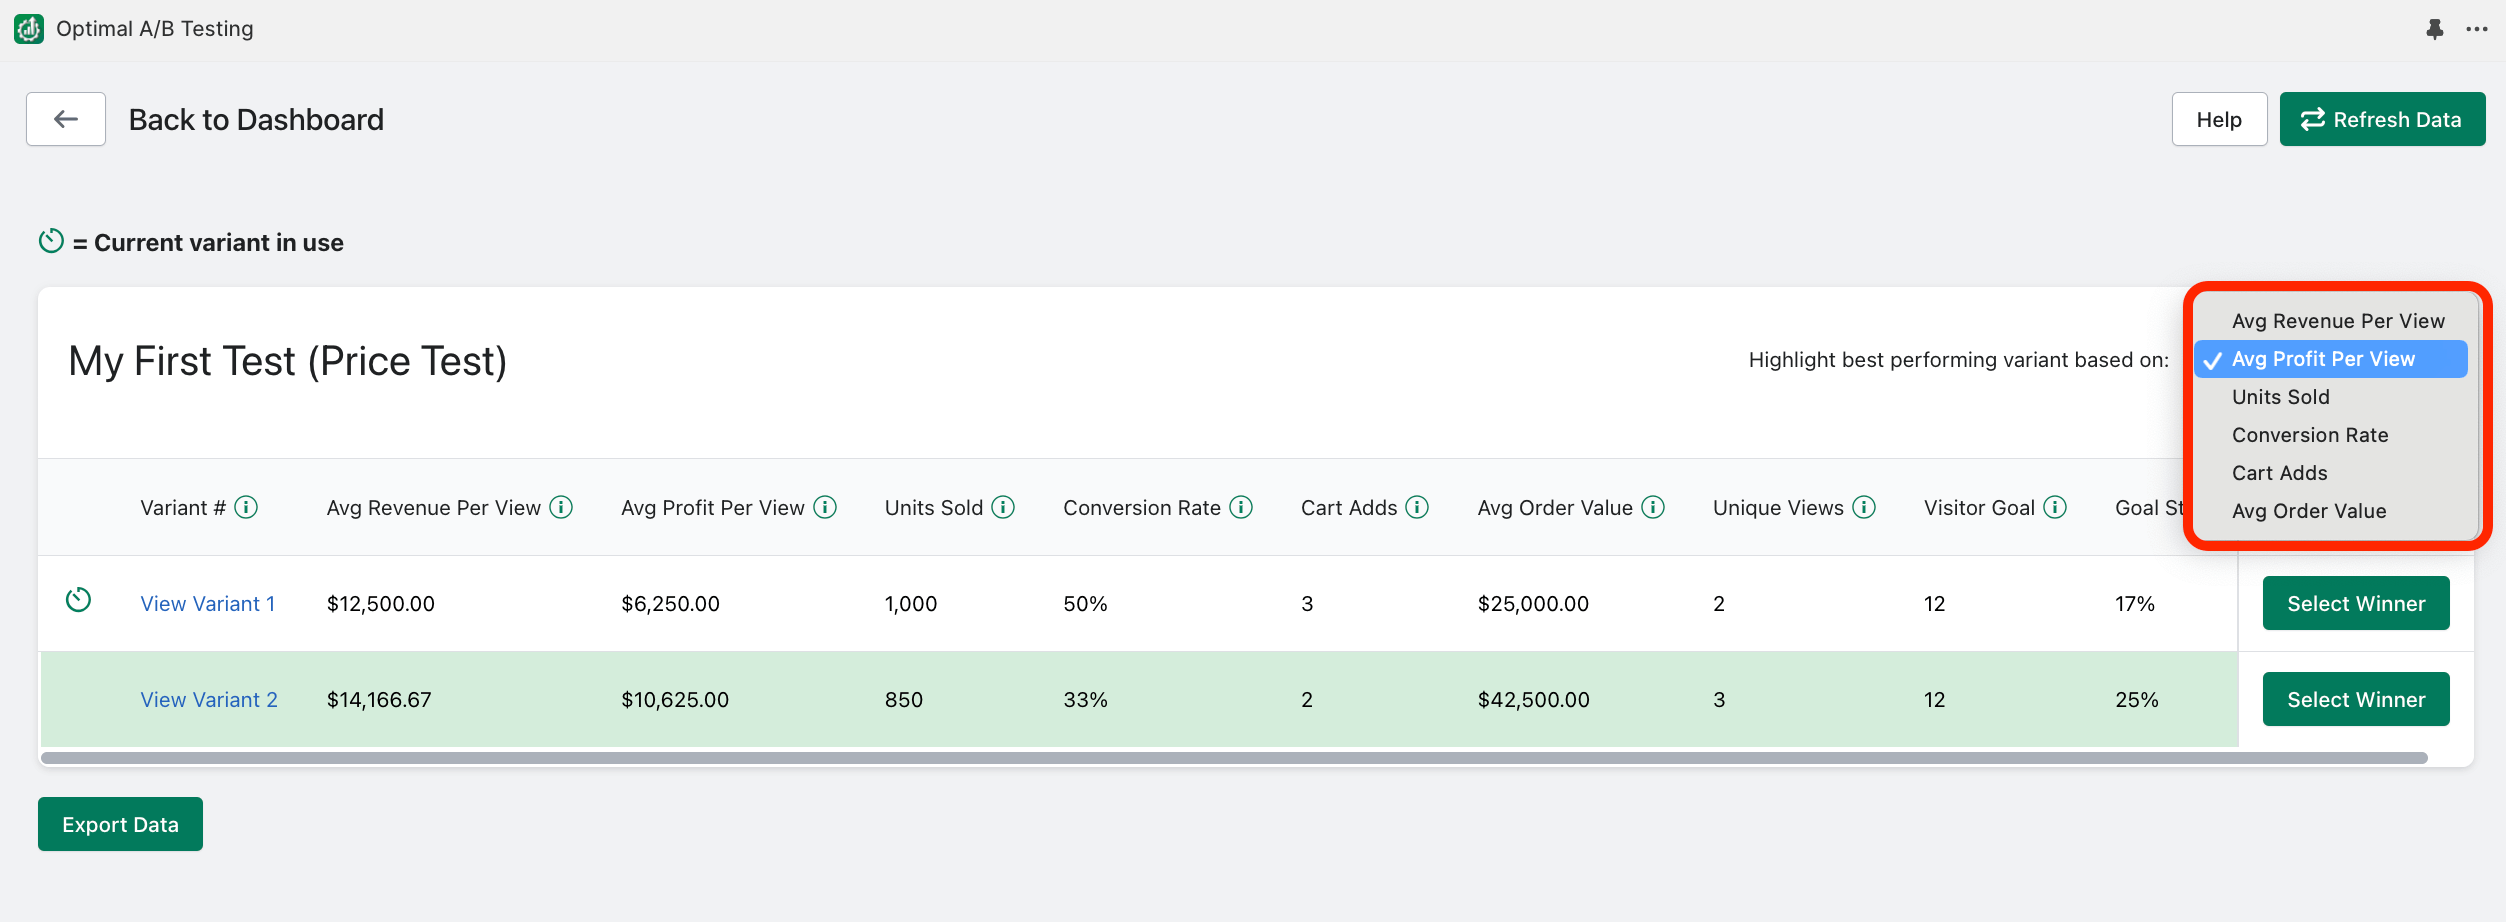
You can also change which variant is highlighted in green to indicate the best performing variant using other metrics:
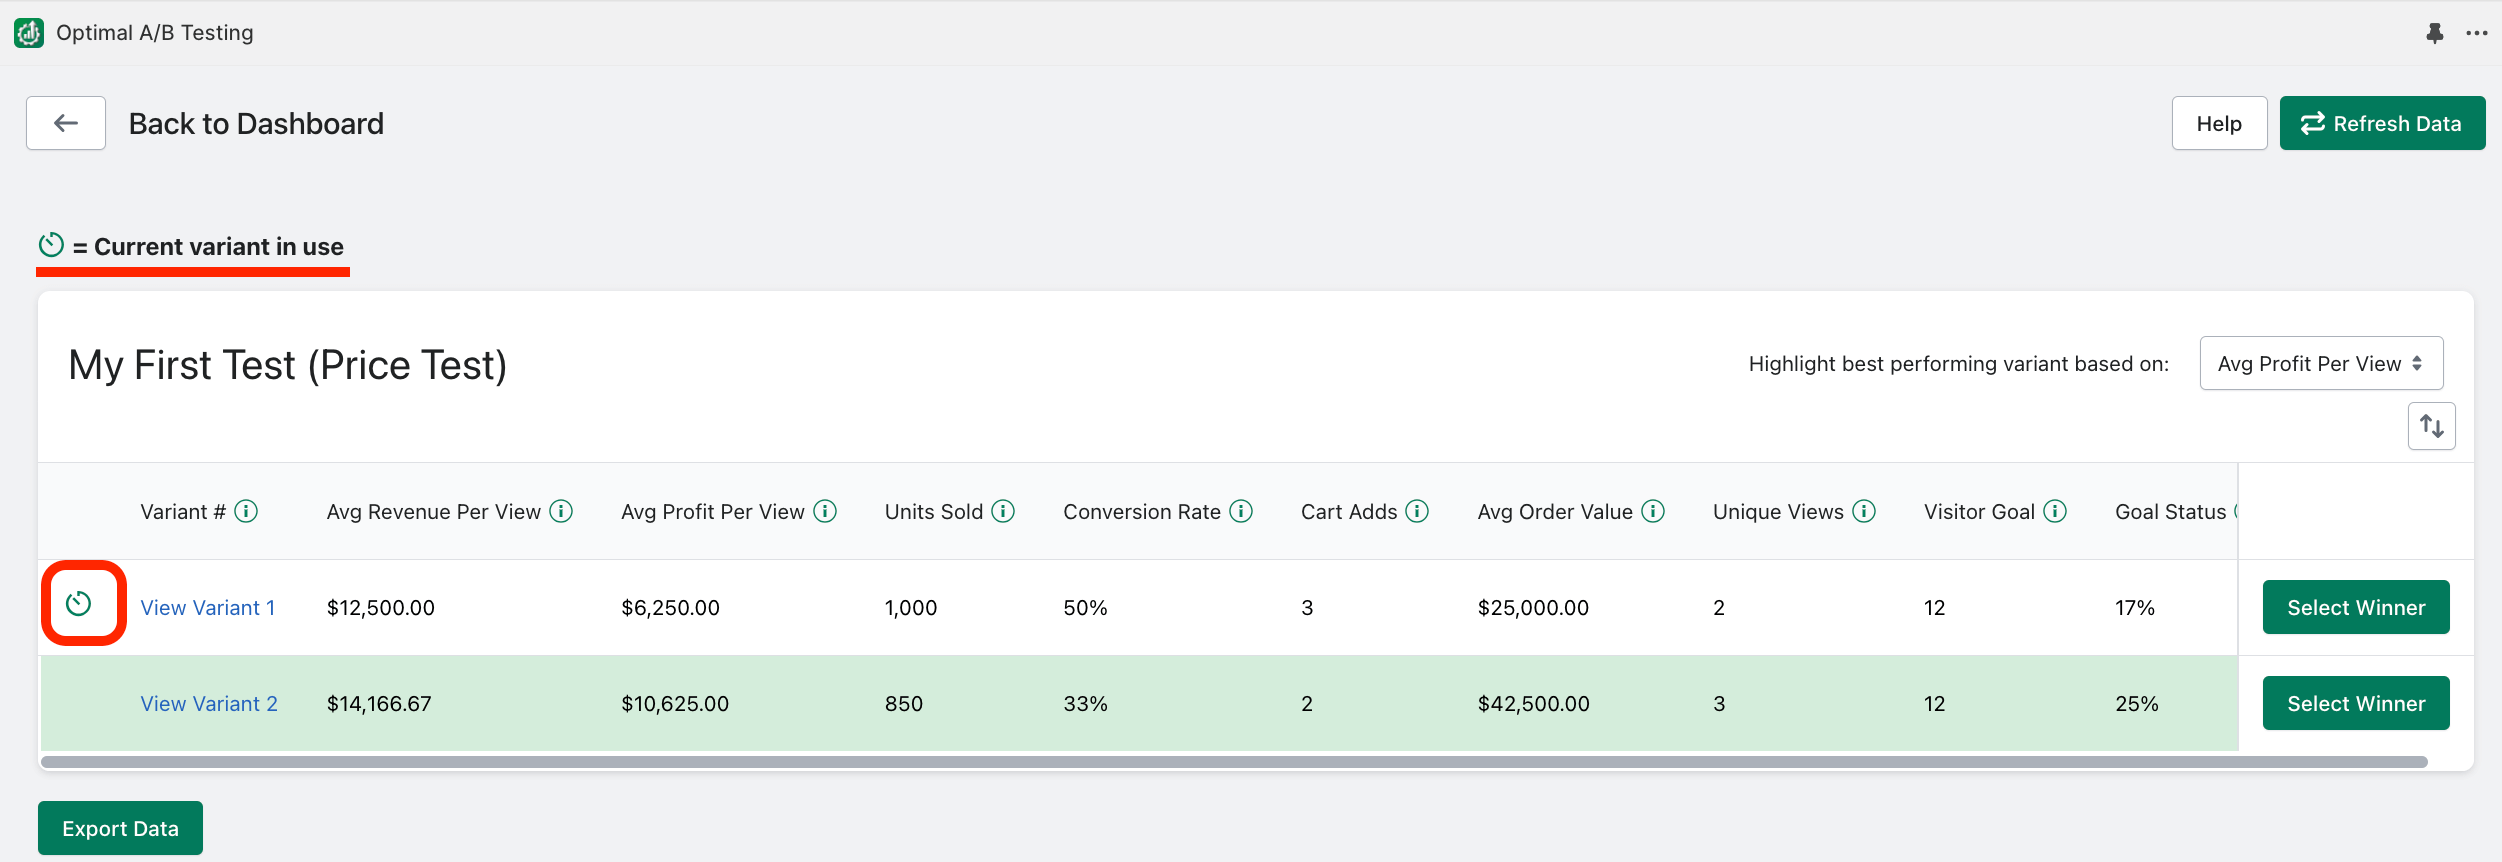
The “Current variant in use” icon lets you know which test variant is currently in use on your product listing:
The “View Variant” link allows you to quickly view how each test variant was setup:
Dashboard
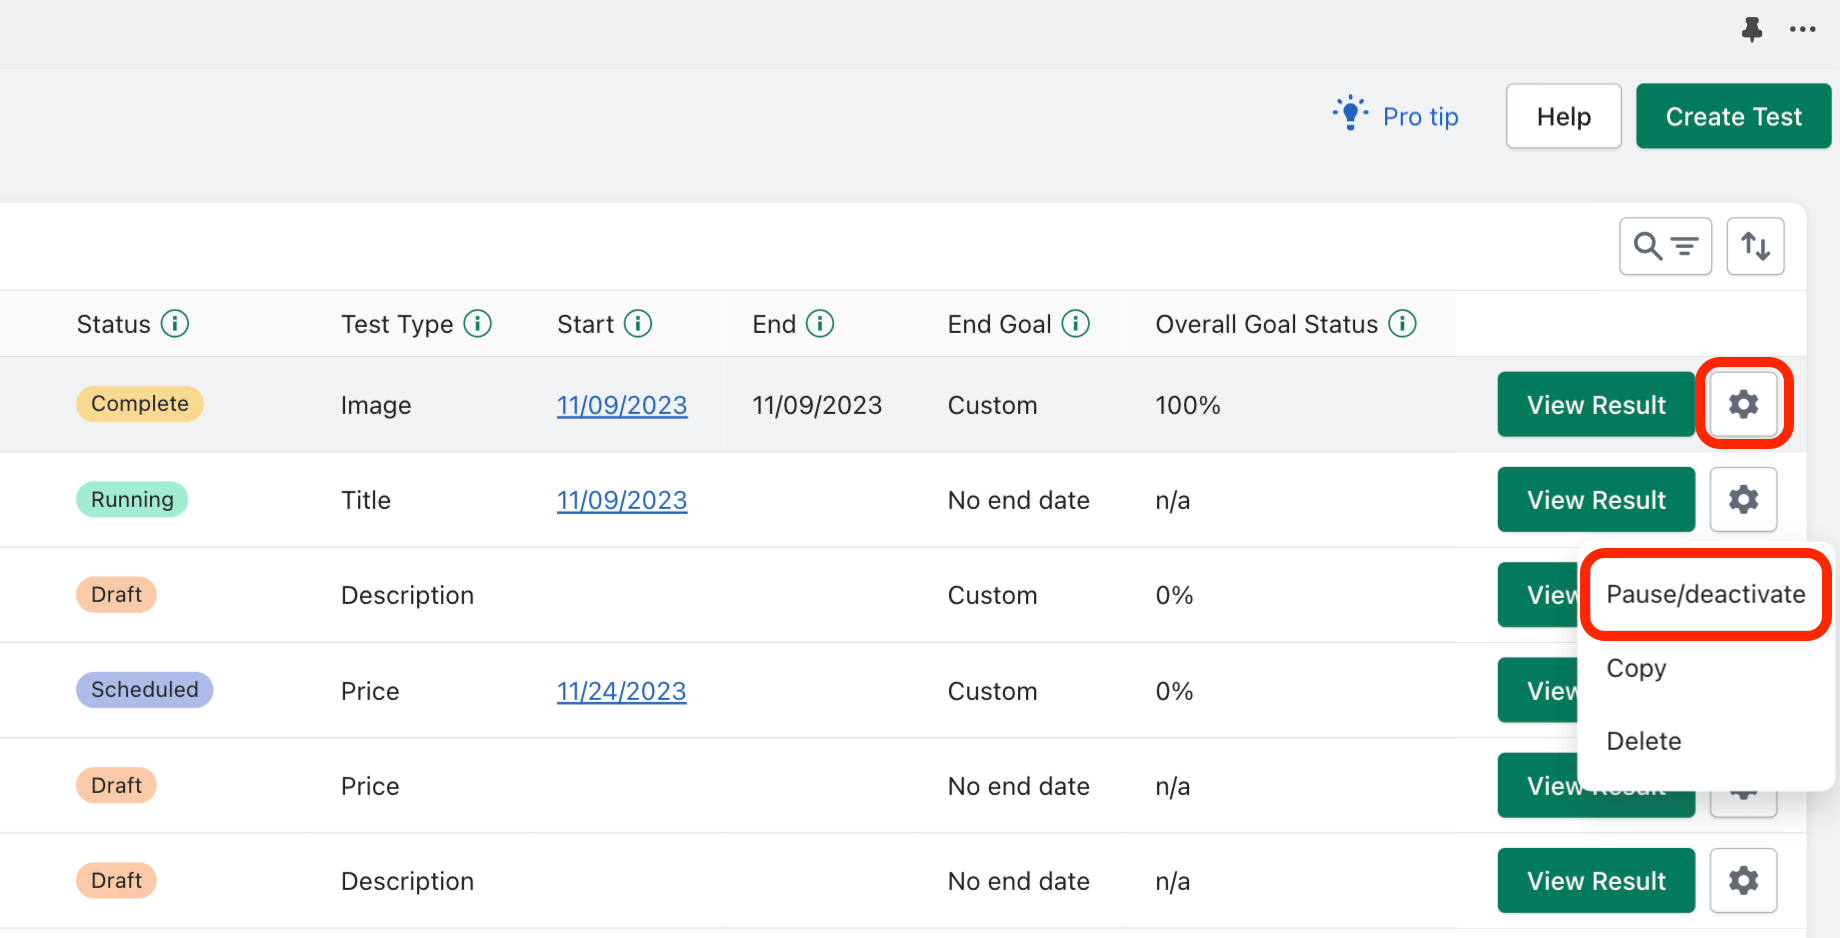
Click the gear icon of a running test to find the “Pause/Deactivate” option:
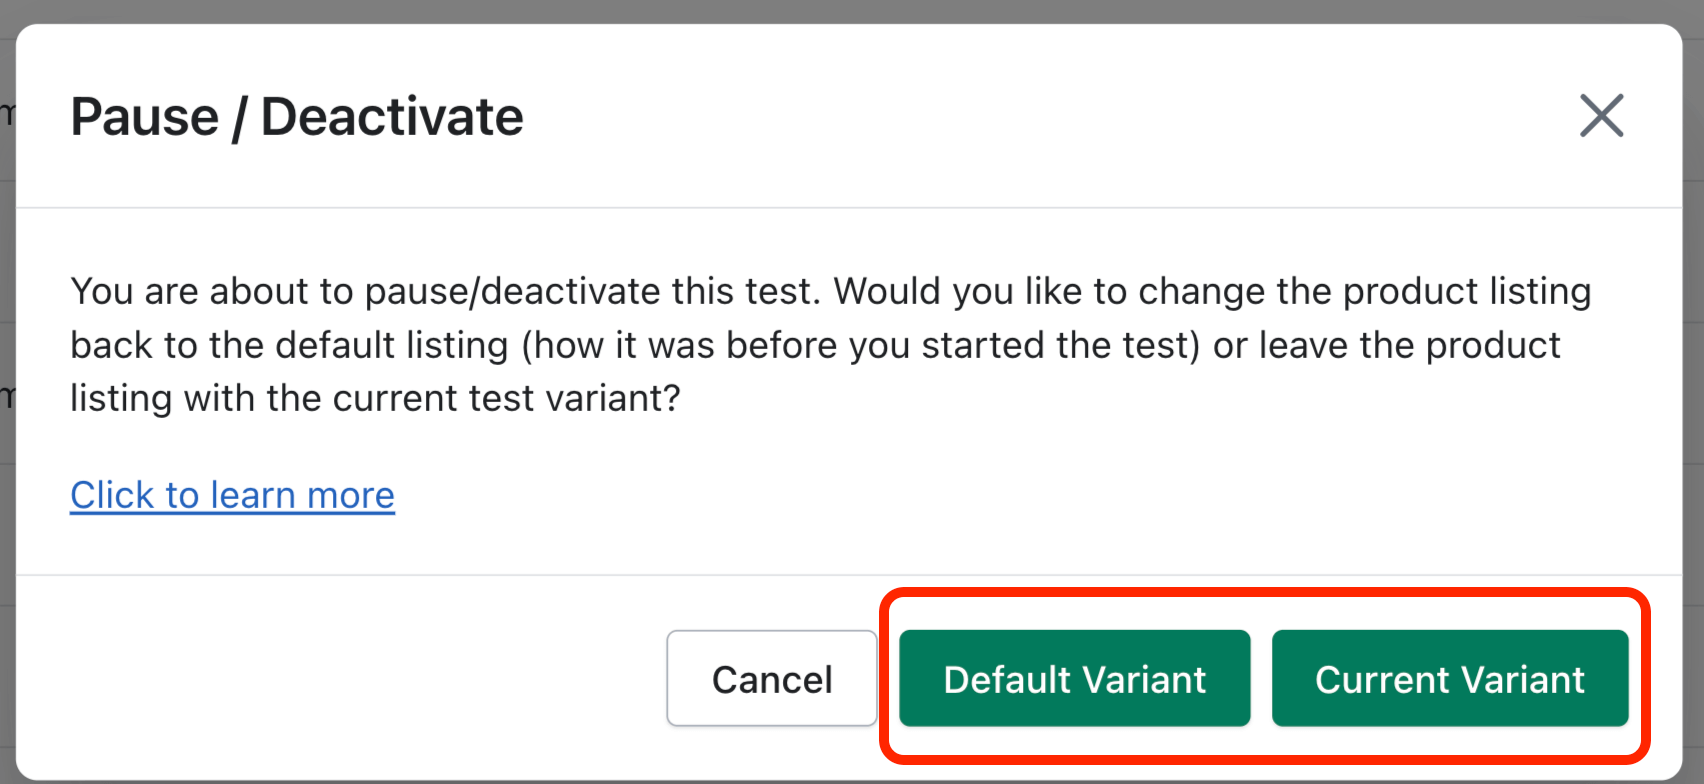
Pausing a test causes the test to indefinitely stop cycling through test variants and we will stop collecting data for the test. To pause the test, you will need to tell our app if we should revert the test variable back to how it was when you started the test (Default Variant), or if you would like to leave the current test variant in place (Current Variant):
You can quickly tell which variant is currently in use by this indicator:

To re-activate a test, click the gear icon and select “Resume/re-activate”:

Click the gear icon to find the “Delete” test option:

Deleting a test will clear all data and test variants associated with that test.
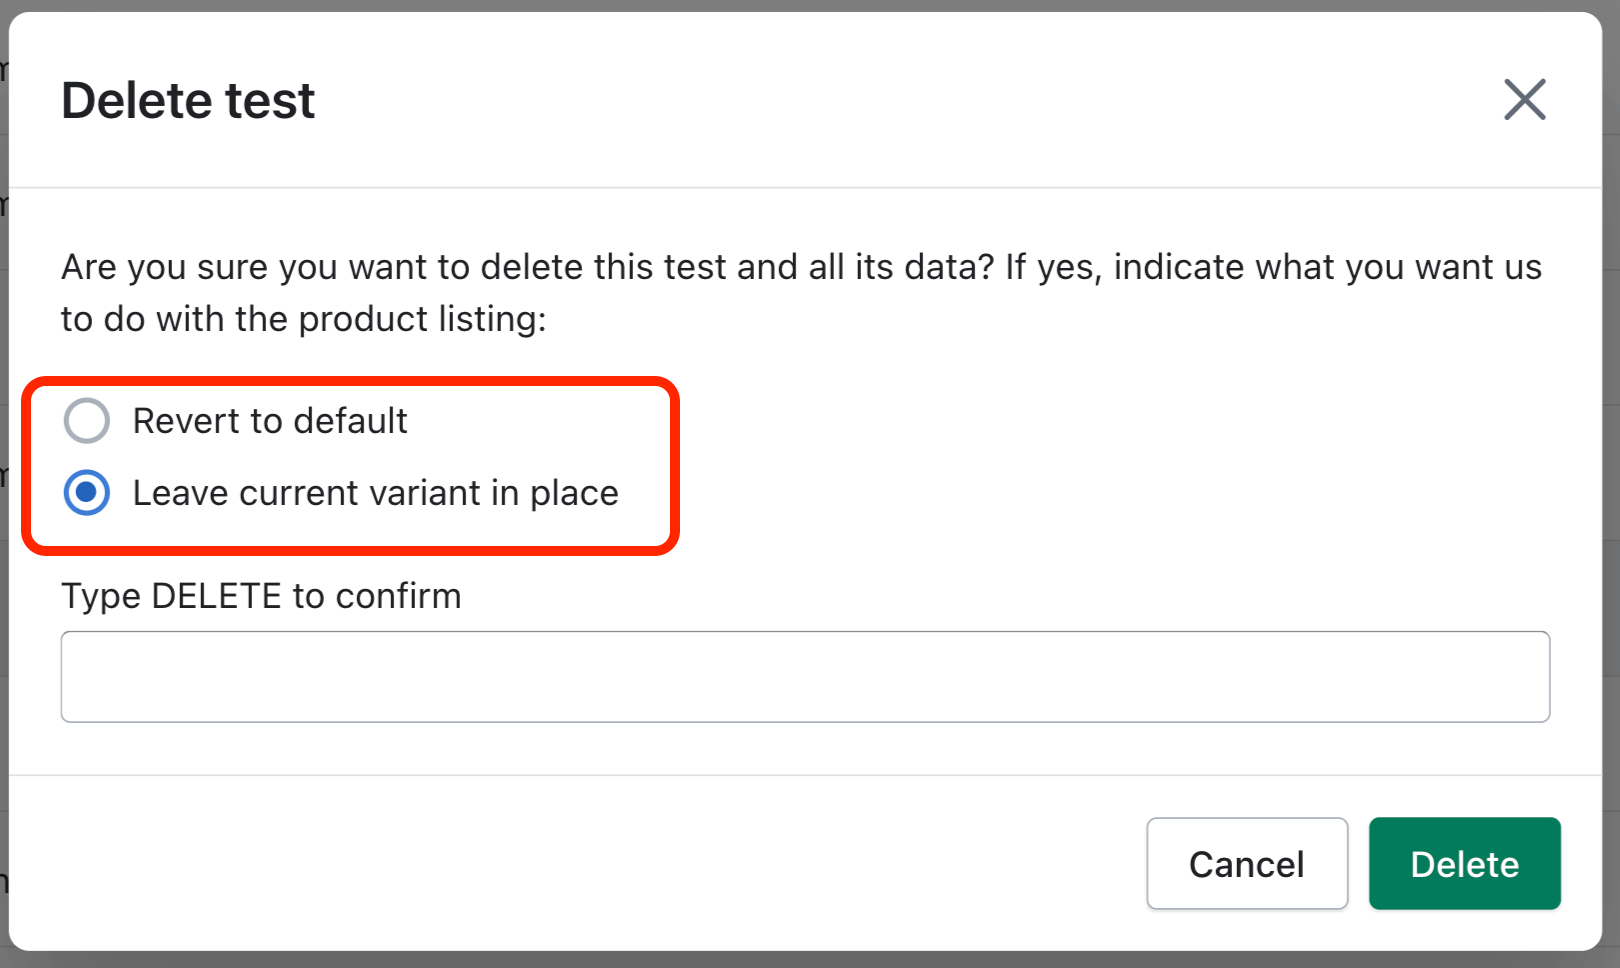
When you select to delete a test, you will need to tell our app if we should revert the product listing back to how it was when you started the test (Default Variant), or if you would like to leave the current test variant in place (Current Variant):
You can quickly tell which variant is currently in use by this indicator:

Click the gear icon to find the “Copy” test option:

You can only edit tests that have not started running yet (apart from the test name). This would include tests with a status of “Draft” and tests with a status of “Scheduled”. To edit a test, you will find the option under the gear icon:

You can only “Resume/re-activate” tests that have not reached their visitor goal yet. Re-activating a test will cause it to resume cycling through your test variants and we will start collecting data again for each test variant. Click the gear icon to resume/re-activate the test:

Clicking the “Start Date” link for a funning test will provide information about when the test is scheduled to change variants next and the frequency of how often the app is cycling through your test variants:

Clicking the “Start Date” link for a test that is NOT running will provide information about what time the test started running and the frequency of how often the app is setup to cycle through your test variants.
If you received a test conflict error, this means that you are trying to schedule or run more than one test at a time for the same product. Running or scheduling more than one test for the same product can lead to multiple variable changes during the duration of a test, which would make it impossible to know which variable change helped or hurt the overall test performance. Instead, Optimal A/B requires that you only test one variable at a time for each product, leaving all other variables the same.
If you receive the “Change Winner Conflict” error message, this means you are trying to “Select a Winner” for a product that currently has a Running test (for a different variable). This would lead to multiple variable changes that overlap during the duration of the test and would make it impossible to know which variable change helped or hurt the overall test performance. This also means you should never modify a product listing outside of the app when you have a running test for that same product (for the same reason).
Optimal A/B’s Enterprise plan offers Advanced Analytics, which allows you to identify which marketing campaigns are most profitable, as we provide analytics by traffic source (Direct, Referrer, & UTM Source /UTM Campaign).
Brief Overview:
Detailed Overview:
When viewing a specific UTM Campaign on the Enterprise plan, if you click “Paid Campaign Settings”:

A window will appear where you can indicate if you have campaign costs associated with the marketing campaign. Here the total campaign cost and product costs can both be factored into our app’s profitability calculation per view:

If campaign costs are saved, the “Average Profit Per View” metric and chart will be displayed (which net out product costs per item and the total campaign cost you entered):

The campaign cost is divided proportionally by the number of views received for the product listing. So given the campaign cost entered was $1000, and each variant received one view (but variant 2 didn’t lead to a sale), $500 would be subtracted from the Average Profit Per View metric for each variant (resulting in a negative $500 Profit Per View amount for Variant 2):
